Tracking Landing Pages
This section aims to investigate how we can track Hubspot’s Website Pages, making sure we are able to track page views and conversions while following the Global Property Standards.
Checklist:
Working on Hubspot:
Working on Google Tag Manager:
Account Settings
1. Add your Google Tag Manager container to your account
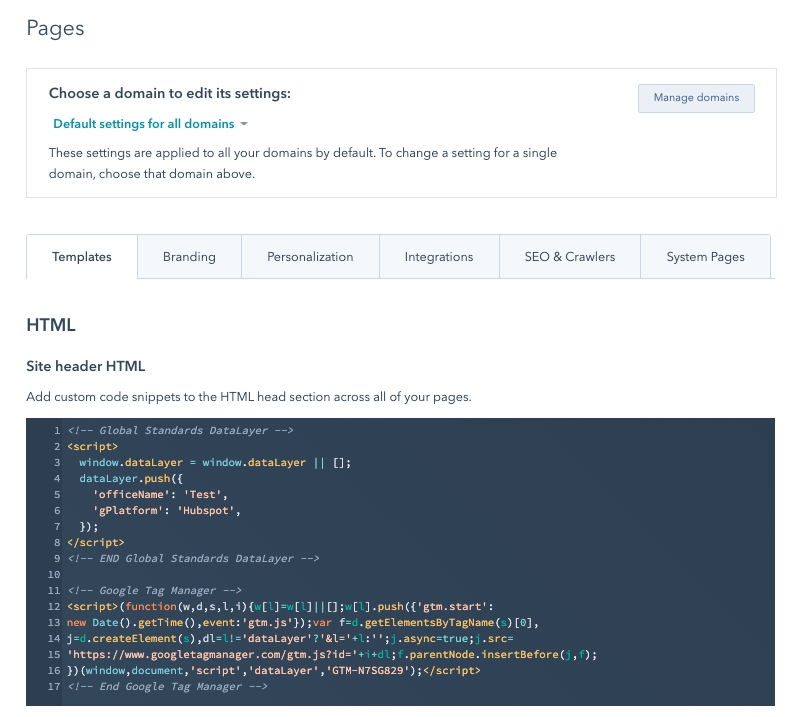
Navigate to your Hubspot Account Settings > Tools > Website > Pages:
https://app.hubspot.com/settings/HUBSPOT_ID/website/pages/all-domains/page-templates
In this section, you will learn two ways to add your Google Tag Manager container ID to all Hubspot pages. Read the details of each implementation type to make sure you are choosing the best option for your website.
A) Add your Google Tag Manager container script to the site header HTML
We recommend choosing this option if you want to fire Google Tag Manager on all pages and control cookies and privacy preferences from within your container:
Important: when you add your Google Analytics or Google Tag Manager tracking code to the header HTML instead of integrating Google Analytics with HubSpot, the Google Analytics script cannot be controlled by the HubSpot cookie policy banner and by default, will record data on visitors regardless of whether a visitor opts in or out – unless you have customized the settings directly in GA script or in Google Tag Manager.
Additionally, you can also customize the site header HTML for each linked domain, but please note that this will override any code you have placed in header and footer HTML for all domains. Learn more about the order that code is applied to your pages.
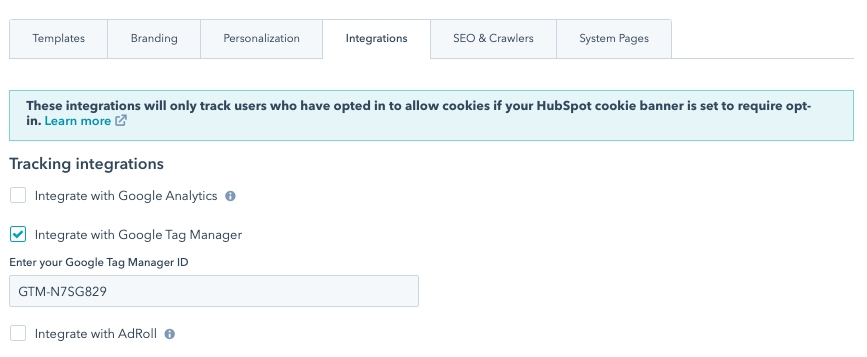
B) Add Google Tag Manager ID in settings directly
Navigate to the Integrations tab, select the integration with Google Tag Manager and input your container ID directly.
If you have GDPR settings enabled or have a cookie policy banner that requires visitor opt-in, Hubspot will only run Google Tag Manager code after user's consent. Learn more. This means that Hubspot won’t fire Google Tag Manager unless user consent is explicitly given. This solution will prevent you from customizing services and tags that should be fired from within your container.
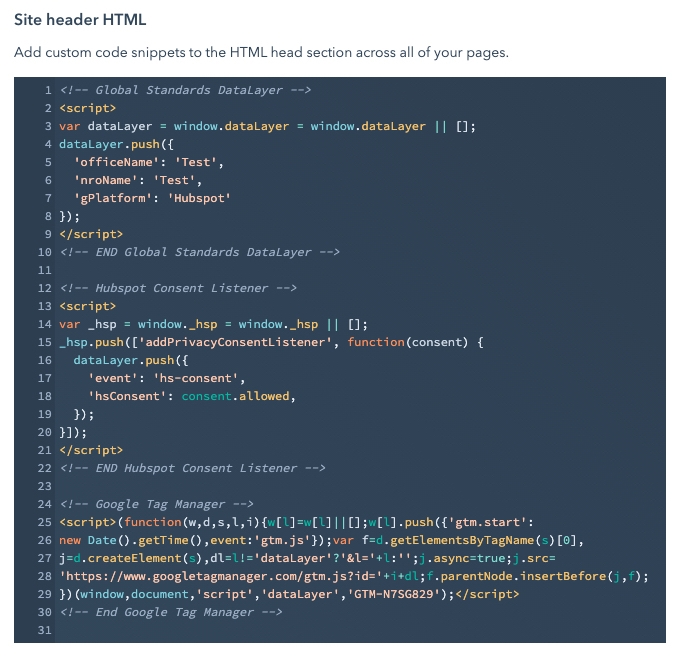
2. Implement the Global Standards DataLayer to your account
In the Global Tracking setup, we use a few dataLayer variables to define our custom dimensions standards. Copy the script below and adapt the officeName and nroName to your case.
Navigate to your your Hubspot Account Settings > Tools > Website > Pages > Domains & URLs and paste the script to your site header HTML. The script should be applied to all domains.
Important: The dataLayer script should always be placed before Google Tag Manager's snippet.
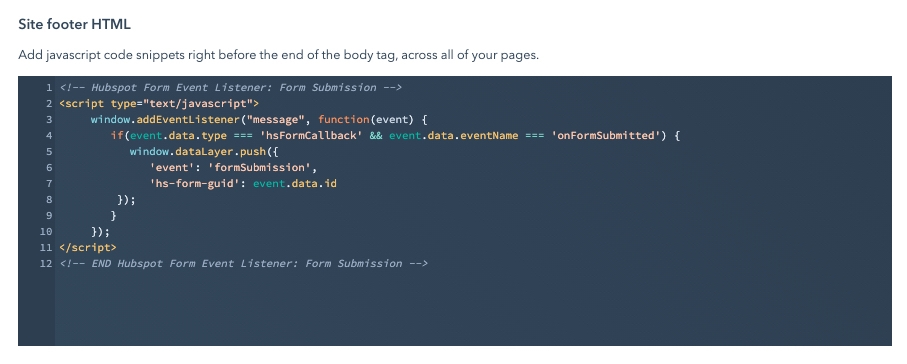
3. Implement a generic Event Listener to your Account Settings
The event listener is a piece of javascript code that will help you to track signup events on Hubspot Forms. The script will capture the event and fire a dataLayer event once the signup is successful. We can use the dataLayer standards events such as formSubmission to facilitate the Google Analytics events set up in Google Tag Manager.
Copy the event listener above and place it on your Footer HTML settings. The script should be applied to all domains. Take a look at the example below:
4. Integrate Hubspot cookies with Planet 4 Consent Mechanism
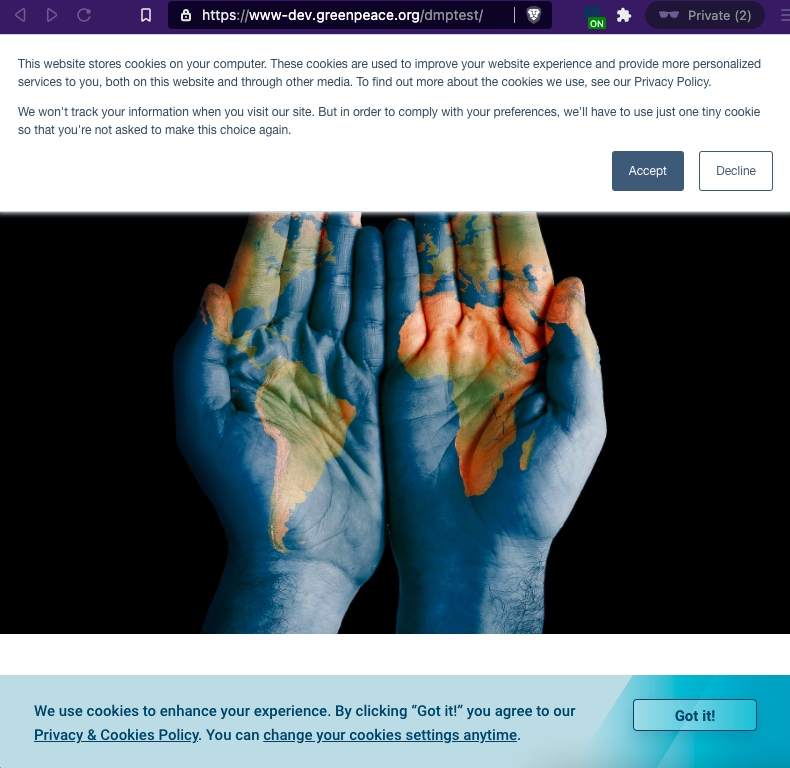
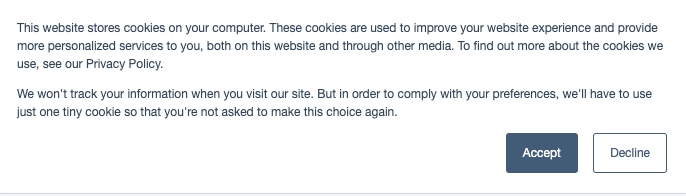
Hubspot WordPress Plugin will automatically add its own cookie bar on the top of all pages of the Planet 4 instance (image below). In some cases, NROS will need to use both consent mechanisms, and we should provide a better user experience by integrating Hubspot to Planet 4 native cookie bar.
To solve this issue, the Hubspot admin must enable a specific cookies policy to be applied in Planet 4 domain.
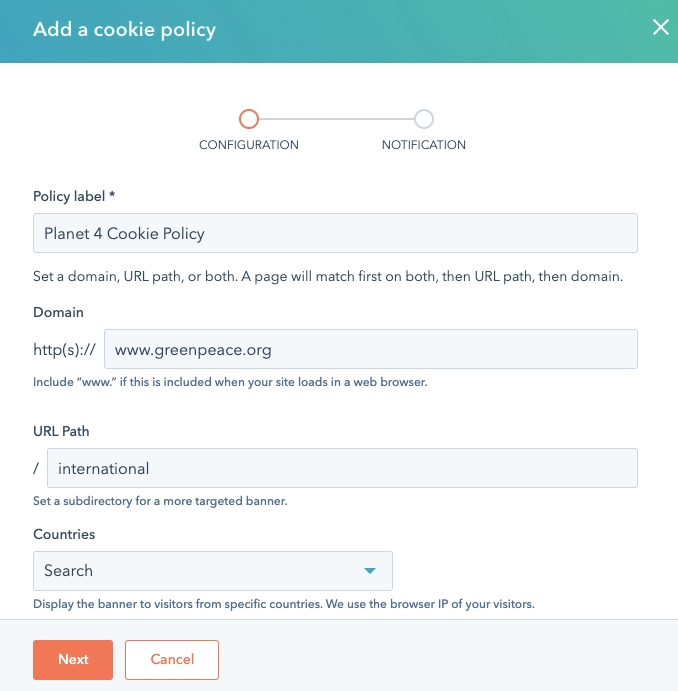
How to add a custom cookie policy?
Navigate to your Hubspot Settings > Privacy & Consent > Cookies
Add a cookie policy and define the label and targeted domain/subdirectory
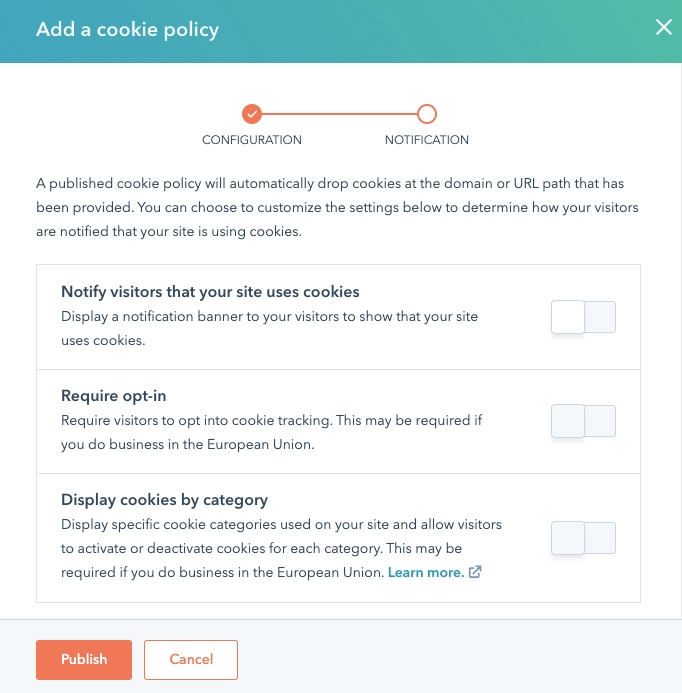
Leave the "Notify visitors that your site uses cookies" setting turned off. As a result, the "Require opt-in" option cannot be turned on, so including the tracking code would immediately add cookies on the specified domain/subdirectory. But, since both consent mechanisms are now integrated, Hubspot cookies will only be placed after the user has given consent on the native Planet 4 cookies bar.
The above solution will allow the HS's default cookie policy to keep working on Hubspot Landing Pages.
IMPORTANT: You must update your Privacy Policy in Planet 4. Don't forget to list all Hubspot cookies, describe what they are used for and their expiration period.
Understand the Planet 4 behaviour:
Hubspot cookies are tied to the "Third-Party cookies" category of Planet 4's consent mechanism.
Hubspot cookies are only placed if the user gives full consent (when the 'greenpeace' cookie is equal 2). Here's an important note: HS cookies are placed after a new page load, not instantly after the user gives consent.
Hubspot cookies are removed when the user revokes consent on the Third-Party cookies checkbox (when 'greenpeace' cookie equals '1') or when the user revokes consent for both (when 'no track' cookie equals 'true'). This happens instantly on the same page.
To read more about Planet 4 cookies check the Handbook documentation.
Landing Page Settings
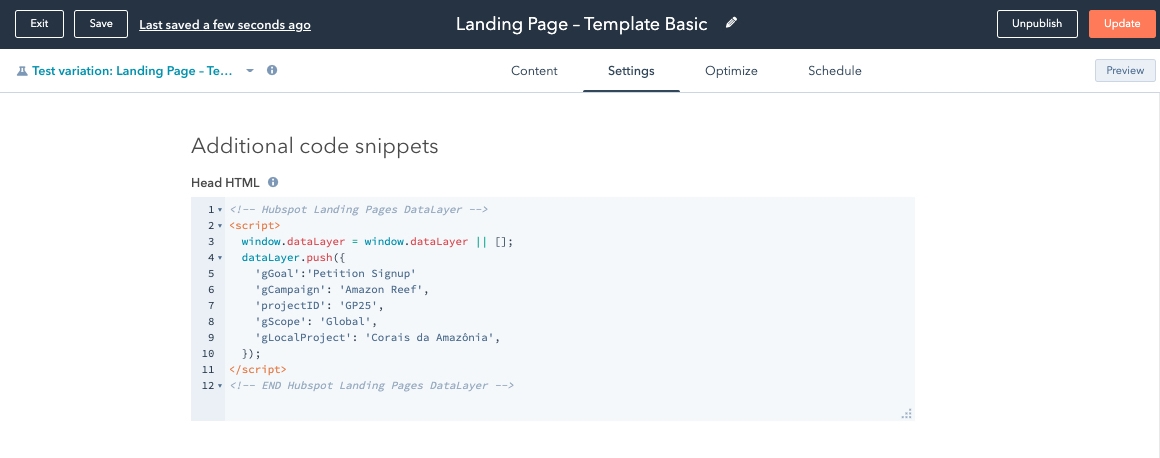
5. Declare dataLayer standards in your Landing Page settings
The dataLayer script is an important part of the Global Campaigns Tracking and will help you to declare additional information on your pages, enhancing the reporting and attribution:
Attribute form submissions to a specific conversion goal Since we are using a generic event
formSubmissionto track any kind of signup in Hubspot Forms, we should also declare the event goal in Landing Page Settings using the variablegGoal. This allows us to send to Google Analytics a specific event category and distinguish different conversion goals.Attribute form submissions to specific projects/campaigns We should also declare specific project information in Hubspot's Landing Pages using the variables
gCampaign,projectID,gScopeandgLocalProject.
Don't miss this step! Declaring the dataLayer standards in your Landing Page settings is a must-have on all pages.
Instructions:
1. Copy the dataLayer script below.
Don't forge to make the necessary modifications on the code according to your page. Check the Global Campaigns Tracking guide for more information.
Understand: The script below is a simplified version of the Global Campaigns Tracking Standards dataLayer. Since we are declaring some of the variables in the Account Settings (step 2) such as gPlatform there's no need to declare them twice in the Landing Page Settings.
2. Customise the script to your specific pages. Change the necessary values according to your page goals and the campaign it should be attributed to:
variable | standard values |
| Petition Signup / Newsletter Signup / Contact Form |
| |
| |
| Global / Local |
| Optional |
| Optional for cross-platform matching. This field can be matched with Sun System budget information and/or Salesforce data. |
| Optional for cross-platform matching. This field can be matched with Sun System budget information and/or Salesforce data. |
3. Navigate to your Landing Page > Settings > Advanced Options > Header HTML and paste the Hubspot Landing Pages DataLayer as the example below:
Google Tag Manager Settings
Now we need to make sure that the Universal Analytics tags for pageviews and events are running correctly on your Hubspot pages.
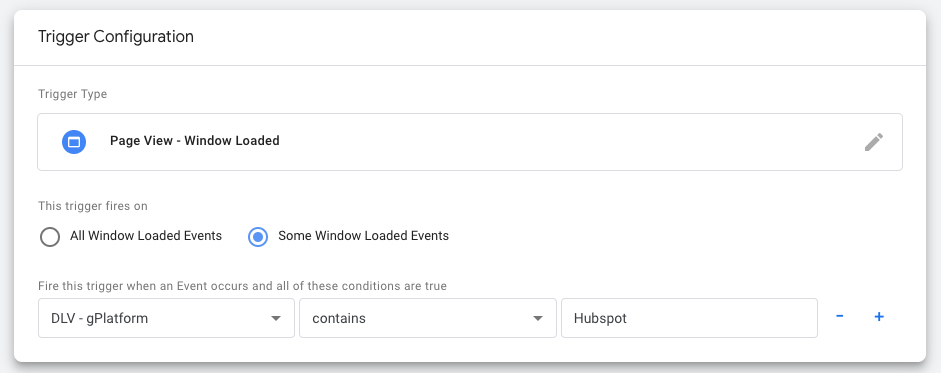
6. Create a trigger for your Hubspot domain
Create a new trigger in your Google Tag Manager to capture all Hubspot pages.
Our suggestion is to create a Window Loaded trigger based on the Page Hostname as the example below:
7. Connect Hubspot to a Universal Analytics Tag
To track pageviews on Hubspot you have two options:
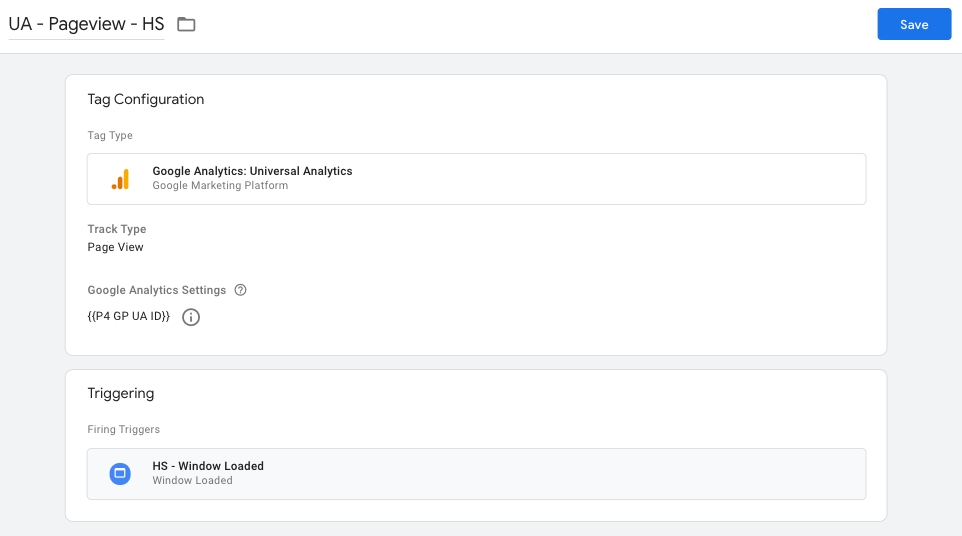
A. Connect your trigger to a generic Universal Analytics tag.
If you want to use the same Universal Analytics pageview tag for all your domains, you can add your Window Loaded trigger (created in the previous step) to this tag.
Don't forget that Hubspot should be tracked by both local and global pageview tags, so you need to repeat these steps twice.
Important: Make sure your Universal Analytics tag is not already firing on all pages otherwise it may send duplicated hits to your Google Analytics property. If this is the case, you can either replace the all pages trigger for specific triggers to each platform or domain (e.g. the trigger created in the previous step) or move to the second option.
B. Create a new exclusive Universal Analytics Tag for Hubspot
Create an exclusive Universal Analytics pageview tag for Hubspot. Choose the same Google Analytics variable that is connected to your Planet 4 website, or the one adapted to the global tracking (eg. "P4 GP UA ID").
Connect your tag to the Window Loaded trigger created in the previous step.
Important: If you have a generic Universal Analytics tag that is running on All Pages, you must add an exclusion trigger to avoid firing this tag on Hubspot. Always verify your setup to make sure you are not sending duplicated hits to Google Analytics.
Don't forget to repeat this process for both local and global Google Analytics properties.
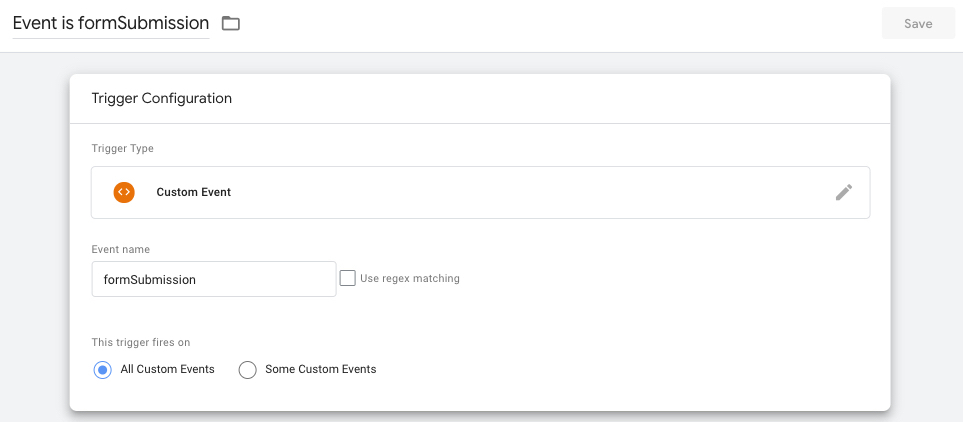
8. Create a trigger for the custom eventformSubmission
formSubmissionOn the step 3 of this guide we implemented an event listener to fire a dataLayer event formSubmission whenever there's a successful sign-up in Hubspot pages.
To capture this event in Google Tag Manager you should create a custom event trigger as below. We recommend naming it "Event is formSubmission"
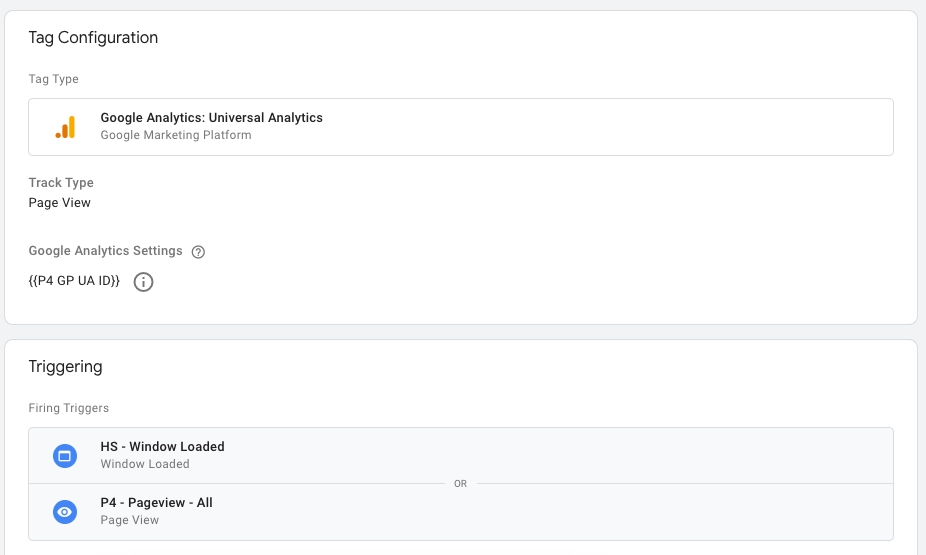
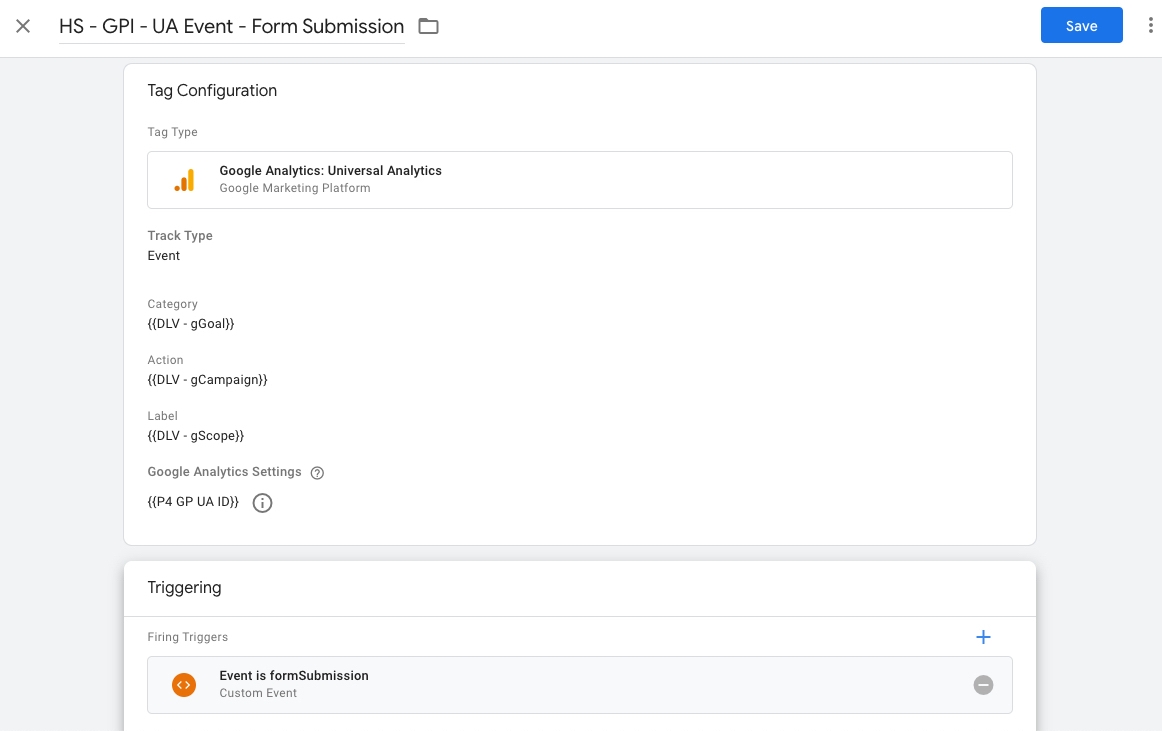
9. Create a standard event tag for Form Submissions
You should create a new event tag for both local and global tracking.
The global tag should follow the standard below and should be connected to the same Google Analytics settings used in the pageview tag. You can use the same setup for your local tracking or adapt the way it's best for your internal reports.
Category:
gGoalAction:
gCampaignLabel:
gScopeGoogle Analytics Settings: same as the pageview tag (step 5)
Trigger: add the custom event trigger for
formSubmissions
If you want more information about the global event standards check this instructions page.
See the example below:
Tip: Once you phase out Engaging Networks don't forget to pause/stop the previous event tag usually named as "EN - UA Event - Petition Signup"
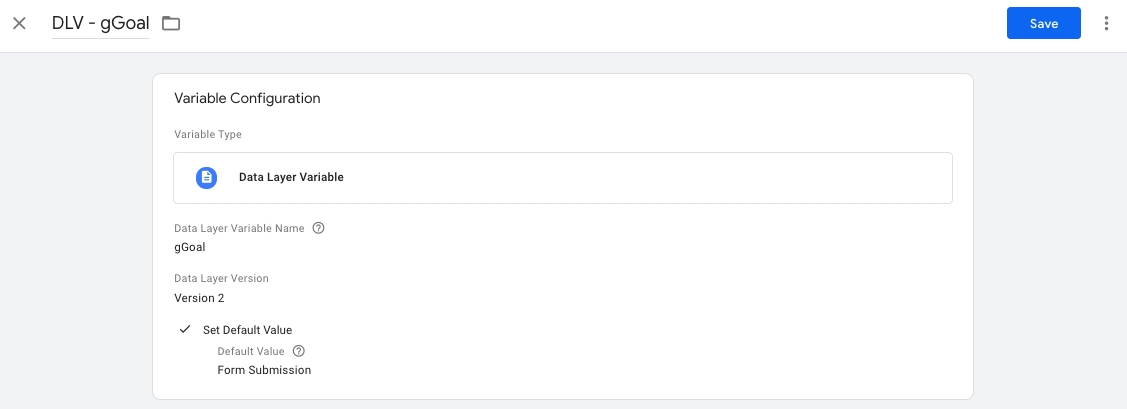
10. Add a default value to the gGoal variable
gGoal variableTo make sure we are not losing any events, you should set a default value on your gGoal variable. On pages where the value has not been specified for any reason, the event will be sent with the category "Form Submission".
Go to your Google Tag Manager > Variables > User-Defined Variables and select the existing
DLV - gGoalSelect the checkbox "Set Default Value"
Add the value:
Form Submission
Manage User Consent from Google Tag Manager
If you have implemented Google Tag Manager directly on the <head> of your pages (step 1 + option A) and you want to control which tags should and should not fire based on users' consent, follow the instructions below.
We can block Google Tag Manager tags from firing based on two settings:
STRICT: Block to all users that did not accept the cookie's consent (didn't click on accept)
FLEXIBLE: Block only to users that declined the cookie's consent (clicked on declined)
Follow the instructions to set up blocking triggers for both use cases.
A) Block tags for all users that did not accept the cookie's consent bar
This setup will help you to block tags to users that didn't interact with the cookies bar or declined consent. This is based on Hubspot's consent callback script.
1. Add the consent callback script to your Hubspot account settings.
Navigate to your Hubspot Account Settings > Tools > Website > Pages (same page setting as used in step 1). Implement the script below in the site header HTML. The script should be placed above the Google Tag Manager snippet.
You can follow the example below:
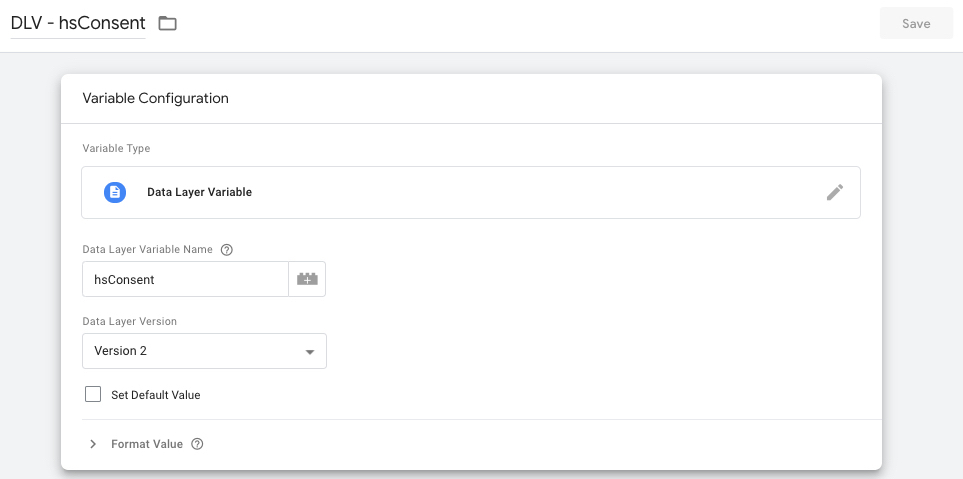
2. Create a variable in your Google Tag Manager container
In your container, go to Variables > User-Defined Variables > New. Choose the Data Layer Variable type and add the variable name hsConsent
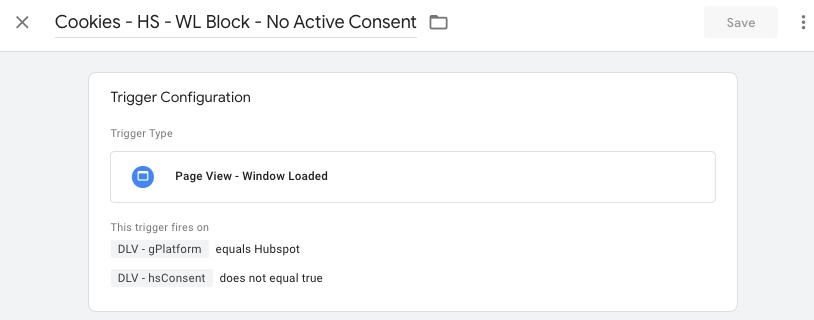
3. Create a new Window Loaded in Google Tag Manager
The variable we just created will now be used in a new trigger. Create a new Window Loaded trigger and select the option "some page views".
Your trigger rule should specify the Hubspot domain (or use the dataLayer gPlatform value to match only Hubspot pages) and the dataLayer variable name.
Page Hostnameequals togreenpeace.org.br;orgPlatformequalsHubspotDLV - hsConsentdoes not equal totrue
Follow the example below:
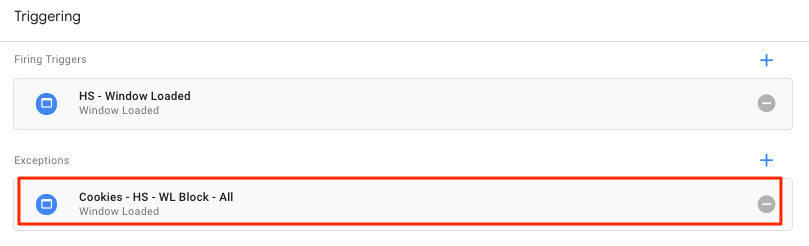
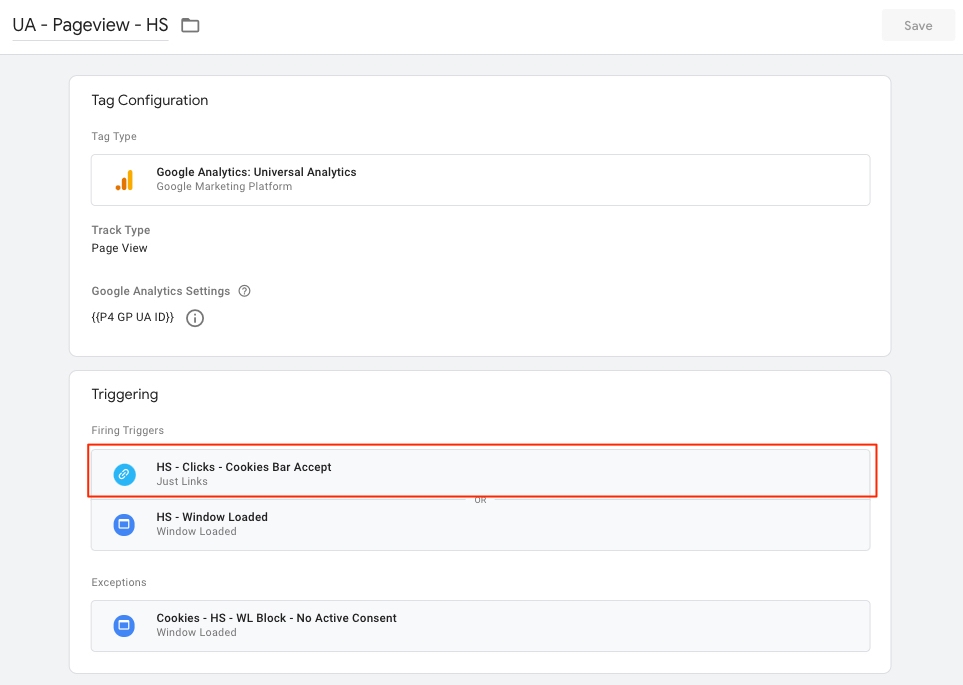
Now you should apply this as an exception trigger to your Universal Analytics pageview tags (same tags as used in step 6).
This will block Google Analytics from tracking any users that didn't yet give explicit consent on Hubspot cookie's bar. Again, don't forget to repeat this step for both global and local tags.
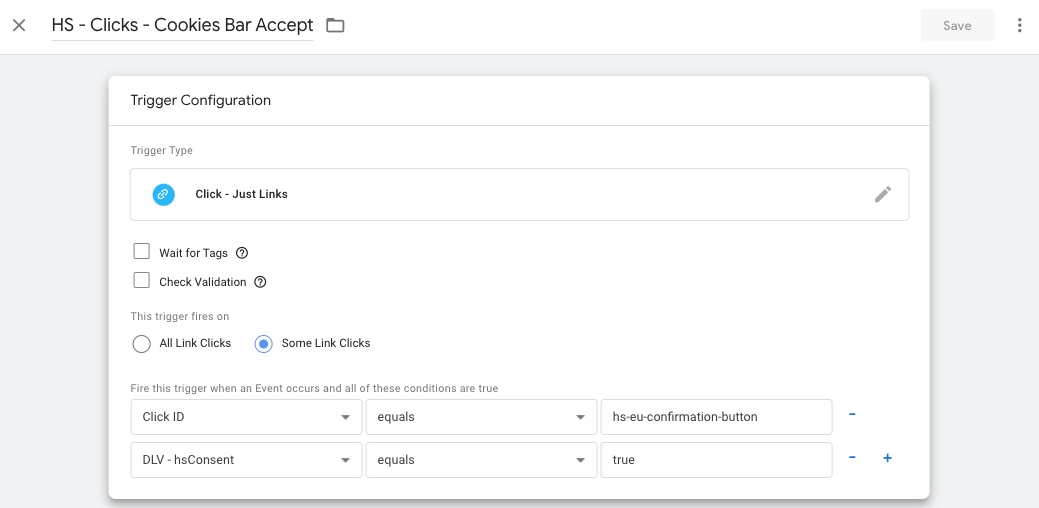
4. Create a new click trigger in Google Tag Manager
This setup will allow you to fire the Universal Analytics pageview tag instantly when the user clicks on ACCEPT in the cookies bar.
Select the trigger type Just Links and the option to trigger in some link clicks:
Click ID equals
hs-eu-confirmation-buttonDLV - hsConsent equals
true
Now add your trigger to the Universal Analytics tag (both local and global). Follow the example below:
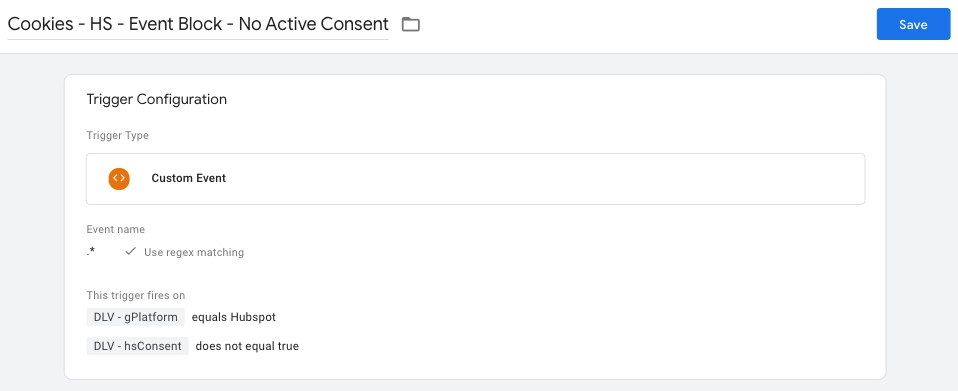
5. Create a new event trigger in Google Tag Manager
Repeat the process above but now you should choose the trigger type as a custom event. Use the RegEX pattern .* to match any event pattern, but specify the rules to match only Hubspot pages and the opt-out cookie value:
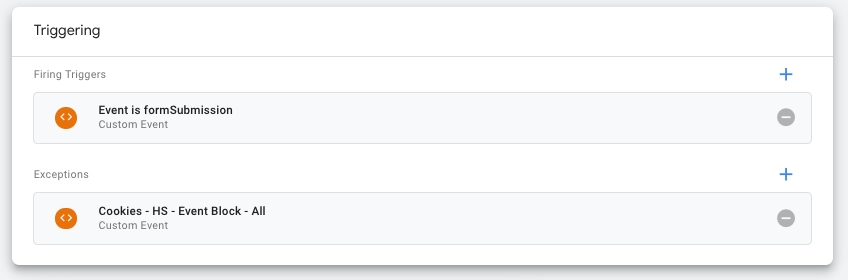
You should apply this trigger as an exception to all your event tags that are running on Hubspot pages:
B) Block tags for users that declined the cookie's consent bar
When a user clicks on decline and rejects the cookie's placement, Hubspot will place an opt-out cookie in the visitor's browser. We need to create a new trigger based on the opt-out cookie.
See more information about Hubspot's cookies here.
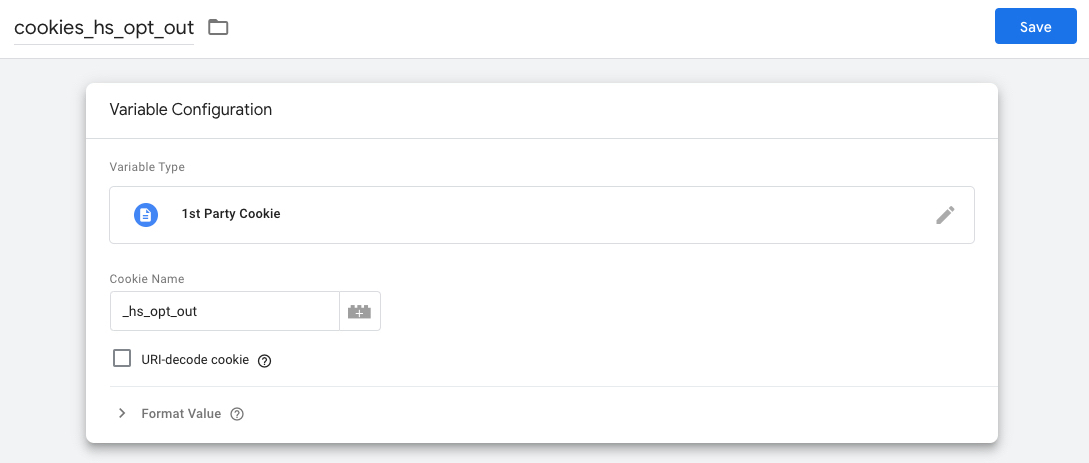
1. Create a new variable in Google Tag Manager
In your container, go to Variables > User-Defined Variables > New. Choose the 1st Party Cookie type and add the cookie name _hs_opt_out
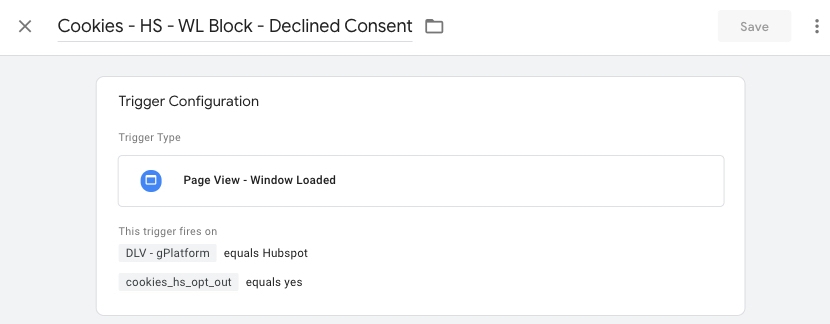
2. Create a new Window Loaded in Google Tag Manager
The variable we just created will now be used in a new trigger. Create a new Window Loaded trigger and select the option "some page views".
Your trigger rule should specify the Hubspot domain (or use the dataLayer gPlatform value to mach only Hubspot pages) and the cookie value:
Page Hostnameequals togreenpeace.org.br;orgPlatformequalsHubspotcookies_hs_opt_outequals toYes
Follow the example below:
Now you should apply this as an exception trigger to your Universal Analytics pageview tags (same tags as used in step 6):
This will block Google Analytics from tracking users that actively declined your cookie's consent bar. Again, don't forget to repeat this step for both global and local tags.
3. Create a new event trigger in Google Tag Manager
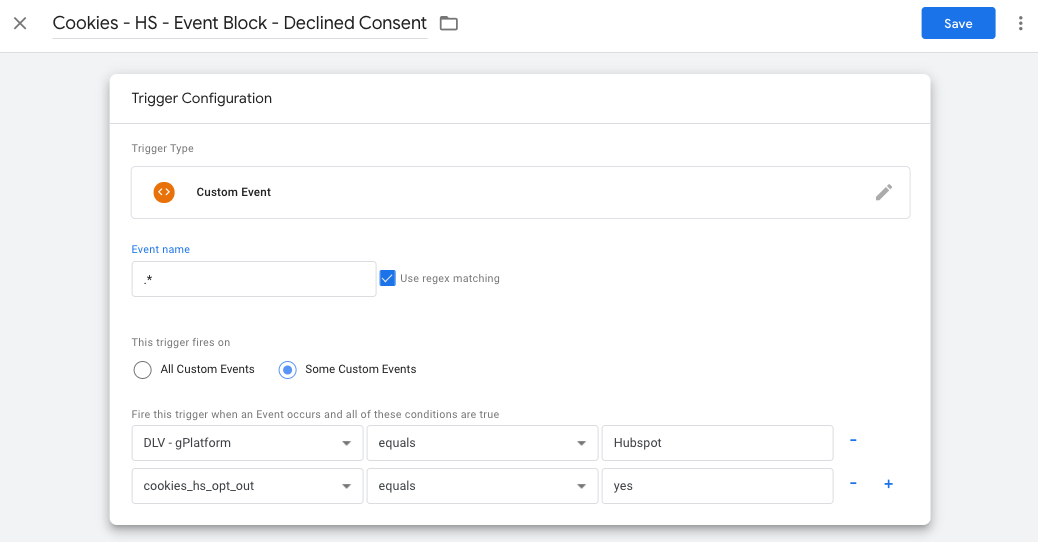
Repeat the process above but now you should choose the trigger type as a custom event. Use the RegEX pattern .* to match any event pattern, but specify the rules to match only Hubspot pages and the opt-out cookie value:
You should apply this trigger as an exception to all your event tags that are running on Hubspot pages:
Debug!
Make sure you are debugging this setup and testing it carefully before publishing any changes live in your Google Tag Manager container.
👀 Watch out this space for a live debug video of this setup.
Last updated