Engaging Networks
This page will help you to track your donations on Engaging Networks.
Tracking Donations
Greenpeace is the only global environmental charity that accepts no corporate or government donations to maintain a much-needed independent voice. This means we rely on individual supporters to fund our work, and the online donation pages connected to our Planet 4 sites are extremely important to our cause.
Online donation pages represent the classic way to fundraise in institutional Greenpeace websites, providing an easy way to donate to our Organisation.
Online donation pages usually consist of two subpages. The first page usually holding the form, donation amounts, accepted forms of payment (Credit Cards, PayPal, Direct Debit, etc..). The second page is the one people are redirected to once they submit the donation, also called the “thank you” page.
Online donation pages are usually set up in external tools, usually custom pages connected to a local payment processor (or Gateway), which collects the donation and processes it, before injecting it into the Organisation’s bank account.
Technical Implementation
Solution A: Engaging Networks + Thank You page
How this should work?
Instructions:
1) CROSS-DOMAINS VARIABLE Update your variable with the donation domain (check instructions here)
2) TRIGGERS Create the following triggers:
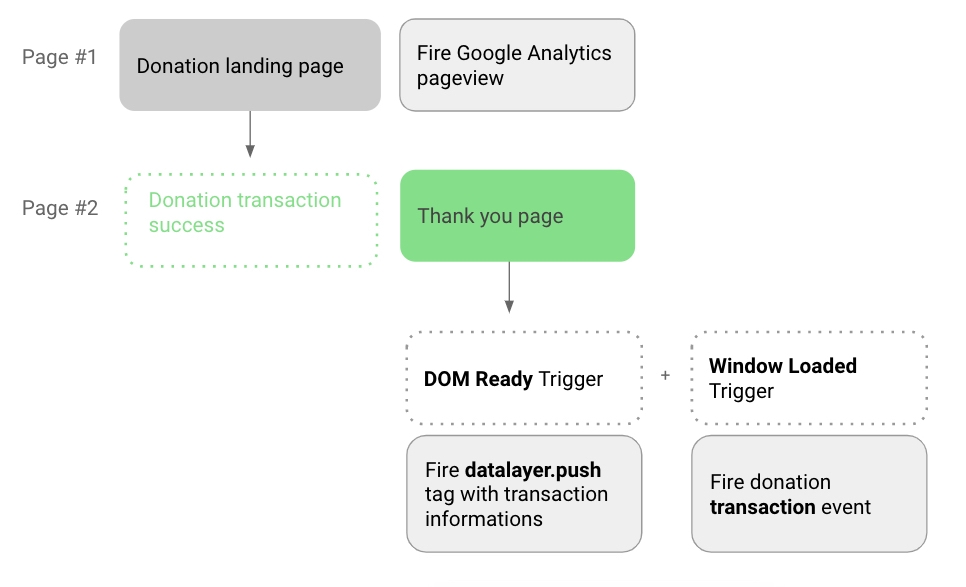
1st trigger: DOM Ready The first trigger will be used to make sure that we populate the right donation transaction elements (amount, currency, etc) in the right order. This should be fired instantly after the user has selected the specific values of the donation or after the donation succeeded.
Connect to the custom HTML tag for dataLayer.push. This should be fired before the transaction tag to populate the values.
2nd trigger: Window Loaded The second trigger should fire on window load.
Connect to the Google Analytics Transaction tag. This tag should fire after the dataLayer.push script.
3) VARIABLES Create the variables to capture transaction elements (amount currency, transaction ID).
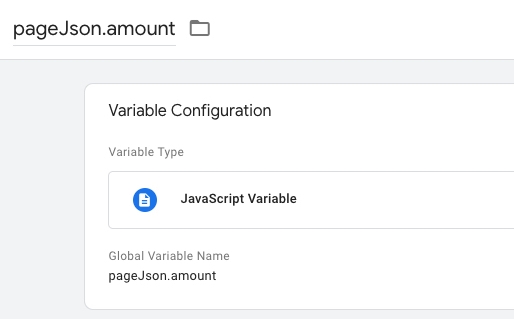
Some fundraising platforms display the transaction values after the donation was completed. Sometimes these values can be read through javascript objects or dataLayer variables.
Example: amount = {{pageJson.amount}}
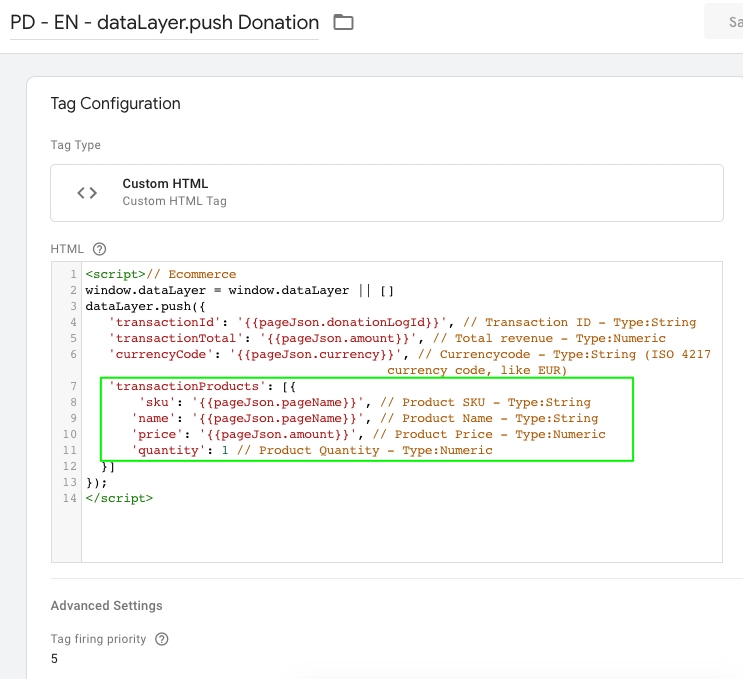
4) DATALAYER SCRIPT TAG (Custom HTML)
Create a custom HTML tag with the dataLayer script. This tag should fire a dataLayer.push script for E-commerce, populated with the transaction elements (amount, currency) etc). Change the {{variables}} in red to the ones that you have just created.
This dataLayer-push should only occur on the confirmation page (e.g. #page 2) , when a user completes a donation, and should only be sent once, it should not be sent again if the user reloads the page at a later time
For Google Analytics to be able to read the data we need to treat a donation as a purchase of a product. This means that we need to pass information in the transactionProducts array, about what type of donations are being made. This means that the product name equals ‘xxx’ and SKU should be generated accordingly. Price is the amount donated, and quantity should always be set to ‘1’.
The values in this script should be populated dynamically. One way to do this would be using a PHP script that collects this information from the server. The variables in red should be adapted to your fundraising system. They can be captured from javascript objects or dataLayer.
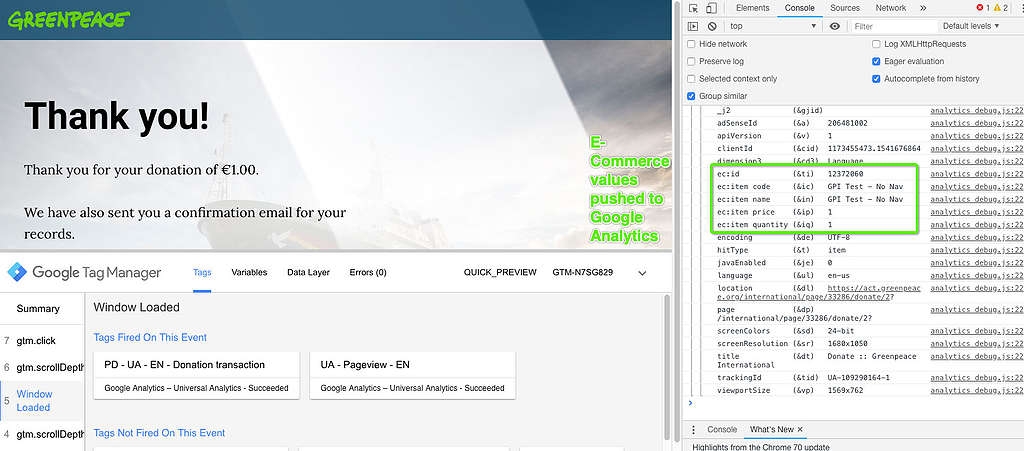
Check a preview of the GPI Google Analytics Settings:
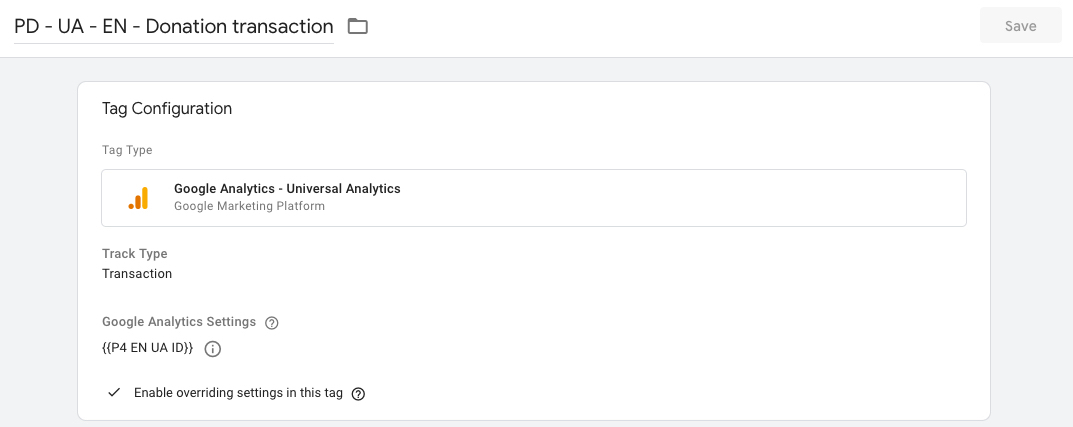
5) UNIVERSAL ANALYTICS TAG (TRANSACTION) Create a default Google Analytics tag with the Transaction track type. Connect it to the GA Settings variable that you have created above.
Check a preview of the GPI Google Analytics Settings:
6) DEFINE THE ORDER (Sequencing) The dataLayer should be populated with the transaction values before the transaction tag is fired. Follow the example below to define the order:
Tag | DATALAYER SCRIPT TAG | UA TAG (TRANSACTION) |
Trigger | DOM READY | WINDOW LOADED |
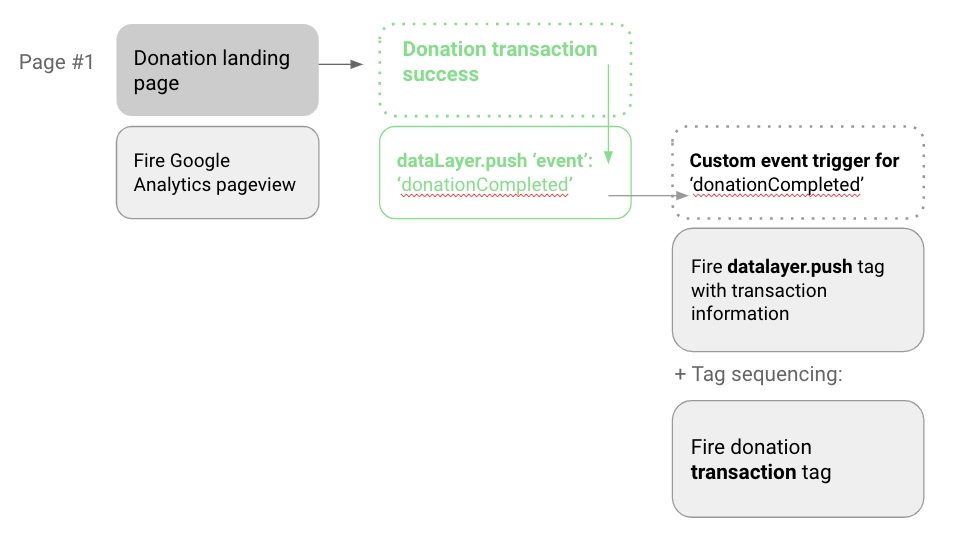
Solution B: Engaging Networks (single page)
How this setup works?
Instructions:
1) CROSS-DOMAINS VARIABLE Update your variable with the donation domain (check instructions here)
2) DATALAYER EVENT Identify if there’s already any dataLayer event fired after the donation in completed. In case there isn’t, please use the code below from your fundraising sytem to push an event after the transaction:
4) VARIABLES Create the variables to capture transaction elements (amount currency, transaction ID). Some fundraising platforms display the transaction values after the donation was completed. Sometimes these values can be read through javascript objects or dataLayer variables.Example: amount = {{pageJson.amount}}
5) DATALAYER SCRIPT TAG (Custom HTML) Create a custom HTML tag with the dataLayer script. This tag should fire a datalayer.push script for E-commerce, populated with the transaction elements (amount, currency) etc). Change the {{variables}} in red to the ones that you have just created.
This dataLayer-push should only occur on the confirmation page, when a user completes a donation, and should only be sent once, it should not be sent again if the user reloads the page at a later time.
For Google Analytics to be able to read the data we need to treat a donation as a purchase of a product. This means that we need to pass information in the transactionProducts array, about what type of donations are being made. This means that the product name equals ‘xxx’ and SKU should be generated accordingly. Price is the amount donated, and quantity should always be set to ‘1’.
The values in this script should be populated dynamically. One way to do this would be using a PHP script that collects this information from the server. The variables in red should be adapted to your fundraising system. They can be captured from javascript objects or dataLayer.
6) UNIVERSAL ANALYTICS TAG (TRANSACTION) Create a default Google Analytics tag with the Transaction track type. Connect it to the GA Settings variable that you have created above.
7) DEFINE THE ORDER (Sequencing)
Edit the DATALAYER SCRIPT TAG and define the tag firing priority as high as possible. Add the CUSTOM EVENT TRIGGER to this tag.
Debug
Using Google Tag Manager preview mode, right click in any browser and select > Inspect, opening the debug window. In the “Console” tab you should be able to see all the data that have been sent to you Google Analytics view.
Extra Resources
Stripe:
Last updated