Privacy & Cookies
IP-anonymization
All Planet 4 Tag Manager containers are by default set up with anonymised IP Address collection. Make sure the IP is anonymized in both Planet 4 pages (“P4 GP UA ID”) and Engaging Network pages (“P4 EN UA ID”).
As mentioned in the General Data Protection Regulation (GDPR), IP addresses do qualify as personal information. We decided, therefore to turn on IP anonymization in Planet 4 Google Analytics to ensure that full IP addresses are never written to the disk.
Turning on IP anonymization is easily set up Tag Manager, just by adjusting your tag or Google Analytics Settings variable by clicking into More Settings -> Fields to Set and then add a new field named ‘anonymizeIp’ with a value of ‘true’:
Cookies Block and Settings
For a fully compliant consent setup on Planet 4, you will need to add a Cookies Control Block to your Privacy Page.
The Cookies Control Block will store the users' preferences through a set of first-party cookies:
greenpeaceused to store the type of cookies that the user gave consentactive_consent_choiceused to inform if the user actively gave consentno_trackused to inform if the user denied consent to all cookies
Cookies Categories
On the Cookies Control Block you have the possibility to set two or three cookies categories:
Default version: allows two categories, commonly used for performance and marketing cookies.
Enhanced version: you'll be able to set three categories of cookies, commonly used for performance, analytics, and marketing cookies.
We recommend using the enhanced version, especially because in most privacy legislation, the analytics cookies do not fall within the ‘strictly necessary’ exemption, this means you need to tell people about its purposes and gain specific consent for their use. You can enable this version on the Planet 4 Settings > Cookies > Enable Analytics cookies.
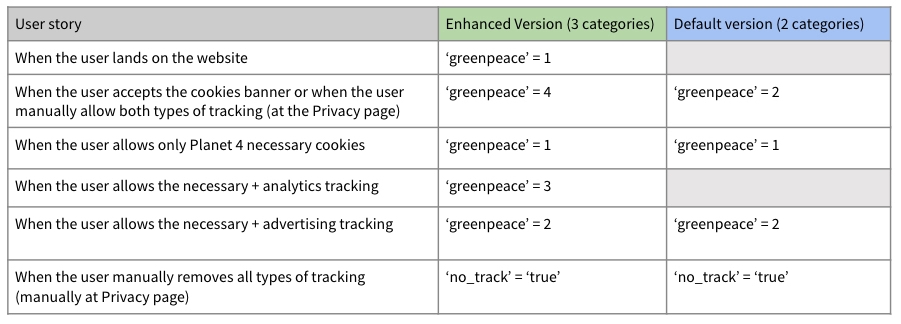
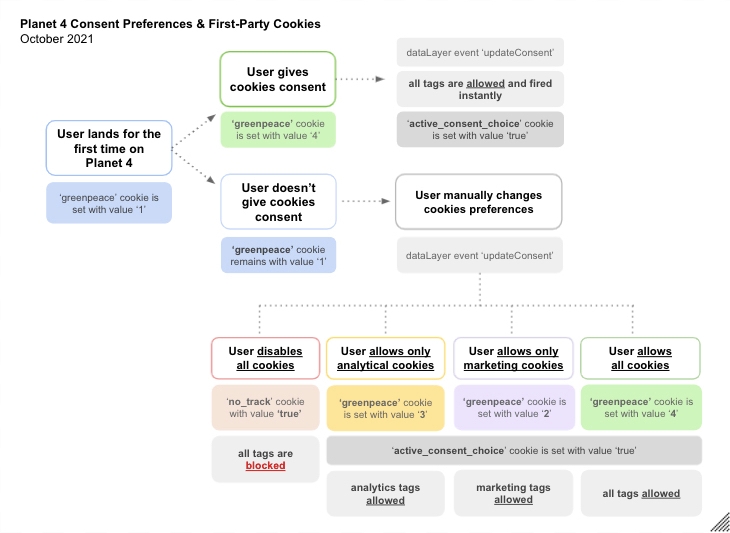
The greenpeace cookie will have different values in each one of the cases. Check the tables below to understand how these values are set up according to users' preferences:
You can also check the user flow below to understand the latest changes to the consent mechanism:
If you are moving from the default version to the enhanced one, you will need to update your Google Tag Manager setup, following the two options below:
Google Consent Mode: The recommended solution would be to implement Google's Consent Mode and get rid of the cookies-based triggers. Check the solution #2 documentation below.
Update your triggers: We are using the
greenpeacecookie value to allow certain tags to run on the container, and since these values are now changing you should update the triggers following the user stories above. Check the solution #3 below for the updated documentation.
Managing consent preferences
Important: Before applying any of the solutions below to your live website, please make sure that you have done your due diligence and verified this setup against your local legislation for cookies and privacy.
Jump straight into the right documentation:
1) Enforce Cookies Policy
This solution has been discontinued as of October 2021
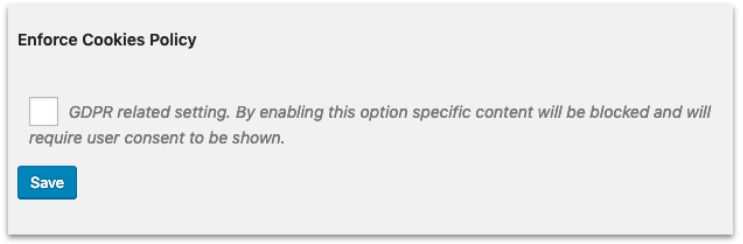
The Enforce Cookies Policy was a solution created to prevent Google Tag Manager container from firing on the page before user consent. To enable this setting you should go to Planet 4 Settings > Cookies > Enforce Cookies Policy.
If the setting is checked -> No cookie is placed on the user browser and Google Tag Manager is blocked.
(!) Important: Google Tag Manager will only be fired on the 2nd page visited after user consent is given. This is a very strict solution and will affect the data collected in Google Analytics (if it's implemented through GTM)
If the setting is NOT checked -> Google Tag Manager will be fired in all pages regardless of user consent and Planet 4's 1st party cookies will be placed instantly. Cookies related to 3rd party services (eg. Facebook, Google) can be managed from Google Tag Manager, see the solutions #2 and #3 below.
2) Google Consent Mode
Level: Strict Setup
Recommended: Compliant and easy to manage on Google Tag Manager. This setup is recommended to all NROs based on EU; recommended to any NRO that wants to follow the Web Analytics. 3.0. standards for protecting our supporters' privacy.
Google consent mode is a new API which helps you to adjust Google tags behaviour based on the consent status of your users, helping you to indicate whether consent was granted for Analytics and Ads storage.
Google consent mode introduces two new tags:
analytics_storage
ad_storage
When consent for ad storage or analytics storage is denied, the associated Google measurement functions deployed via global site tags (gtag.js) or Google Tag Manager will adjust their behavior accordingly. In other words, Google’s ad_storage and analytics_storage consent types will dynamically adapt, only utilizing cookies for the specified purposes when consent has been given by the user:
When consent is granted, the associated tags will function normally;
With the
analytics_storagetag, if consent is given, Google Analytics will collect detailed analytical data. But even if there is no consent, some basic measurements are still passed to Google (eg. Timestamp, Referrer) but won't appear in your reports.The
ad_storagetag instructs Google Consent Mode to control the behaviour of marketing cookies. If consent is denied, advertisement will be less targeted.You can also manually add these consent types to any other Google Tag Manager tag (using the Consent View).
For example, if a user does not provide consent for ads cookies (and therefore advertising purposes are disabled), but does provide consent for analytics cookies, you’ll still be able to measure site behaviour and conversions in Analytics as the analytics_storage setting will be enabled.
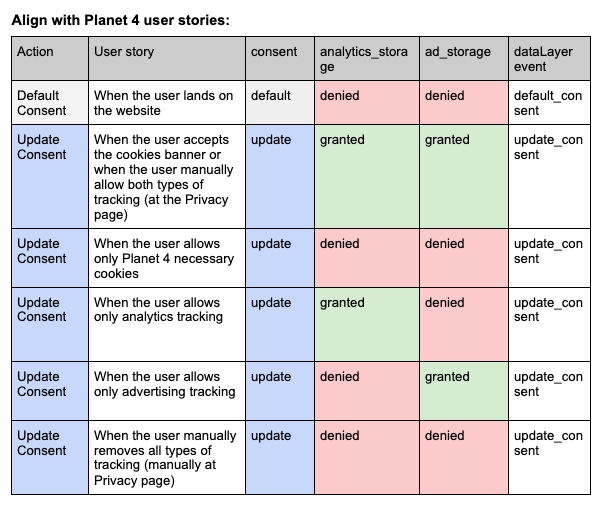
See below how the Consent Mode was adapted to Planet 4 user consent preferences:
Implementation instructions:
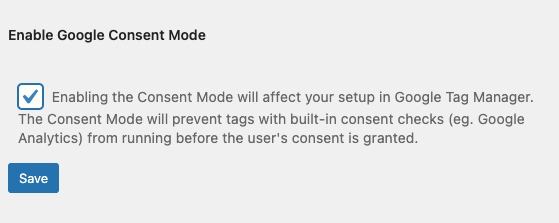
1) Enable the Consent Mode on Planet 4 Settings > Analytics
Important: Once implemented, the Consent Mode will immediately start working with all Google’s tags implemented via Google Tag Manager. If you were using a more flexible setup, please be aware that this will potentially cause disruptions to the collection of data on Google Analytics properties.
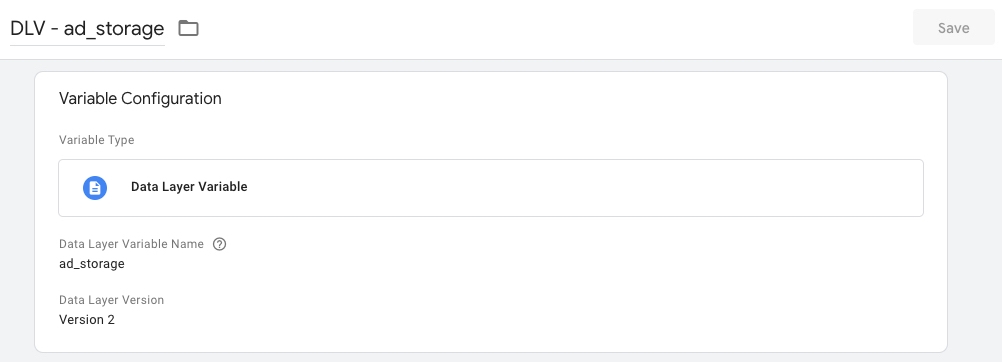
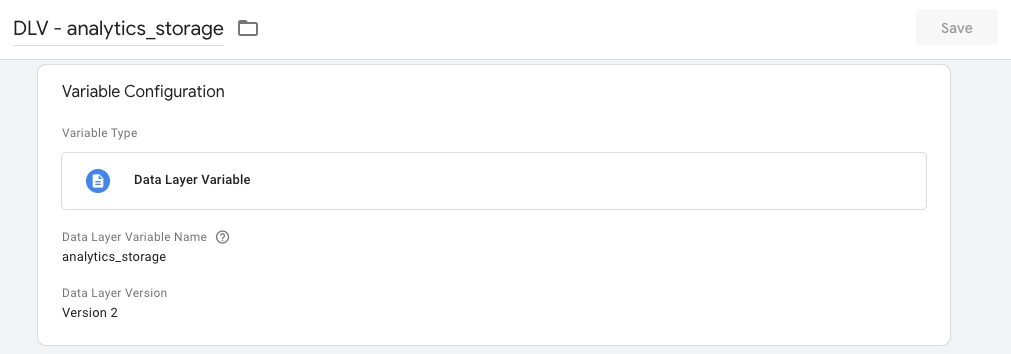
2) Create new custom dataLayer variables
In your container, navigate to Variables and create two new Data Layer variables with the following setup:
{{DLV - ad_storage}} to capture the variable name
ad_storage{{DLV - analytics_storage}} to capture the variable name
analytics_storage
Follow the examples below:
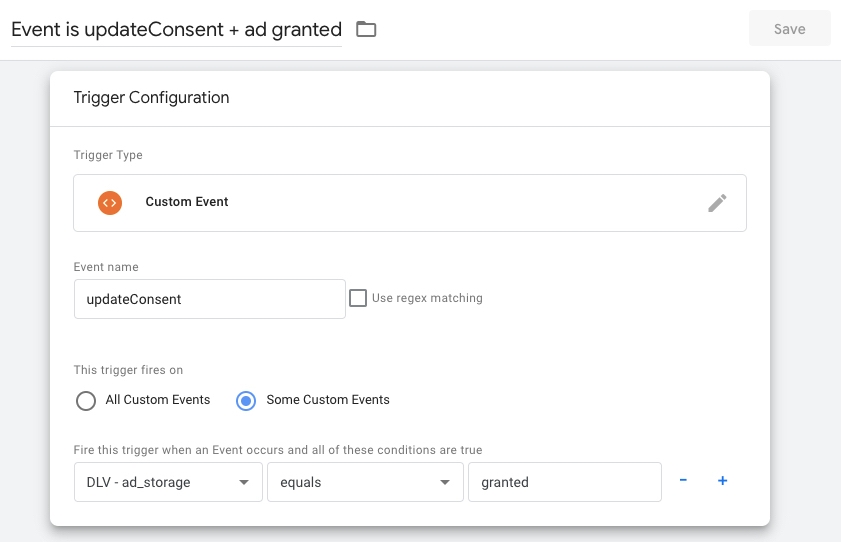
3) Create two new custom event triggers
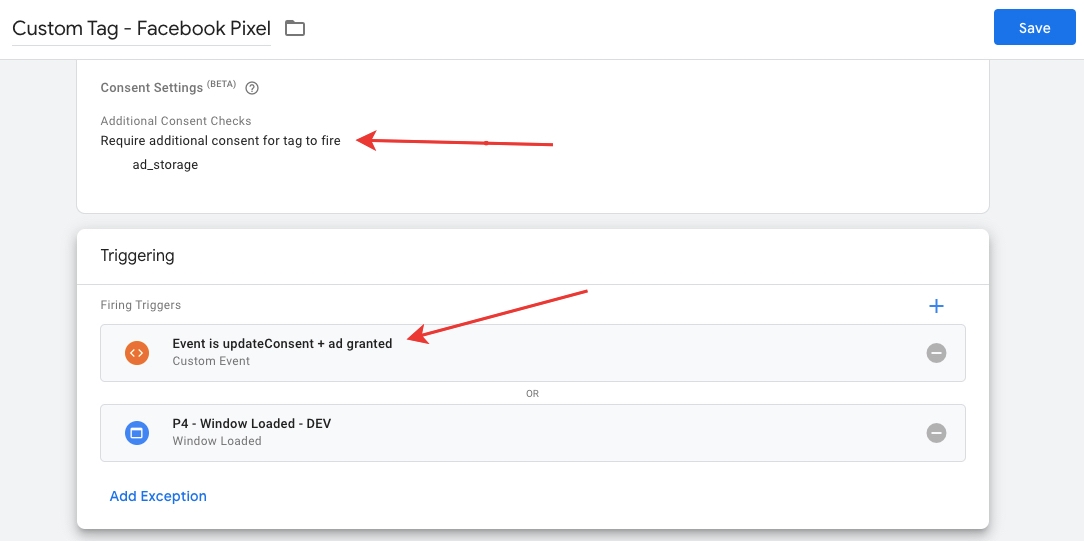
Create a custom event trigger called "Event is updateConsent + ad granted" to fire on the dataLayer event updateConsent. Set the trigger to fire in some events: when the variable {{DLV - ad_storage}} equals granted.
See the example below:
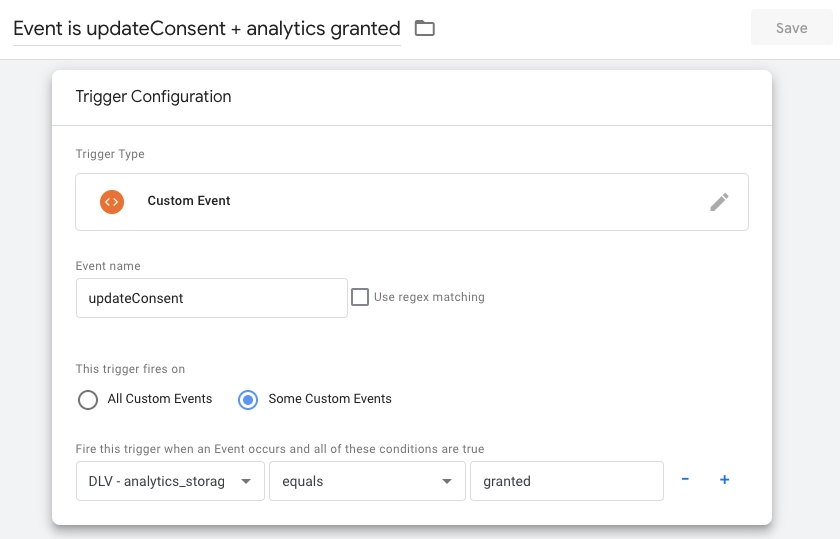
Repeat this step and create a custom event trigger called "Event is updateConsent + analytics granted" to fire on the dataLayer event updateConsent. Set the trigger to fire in some events: when the variable {{DLV - analytics_storage}} equals granted.
4) Use the Consent View to add the consent checks to your tags
These consent checks are built-in into most of Google's products tags, but we still need to add them to our custom/3rd party tags.
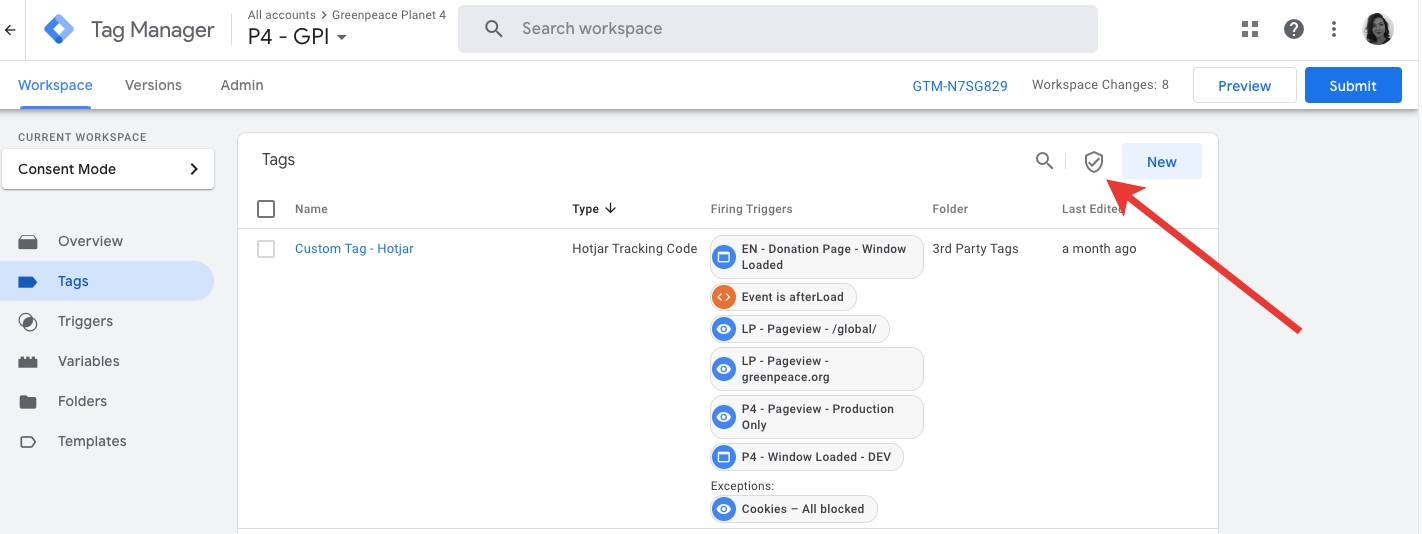
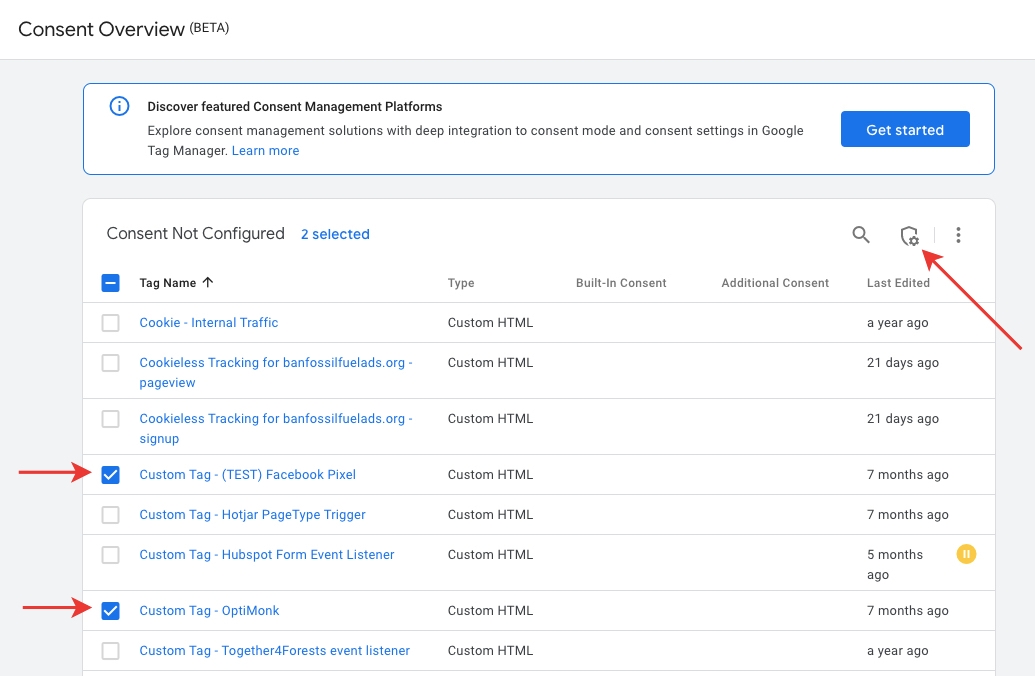
4.1. Navigate to your Tags area and click on the Consent View icon:
4.2. Select the tags you'd like to edit and click on the icon to bulk edit all of them:
4.3. Select the option "Require additional consent" and select the type of consent check you'd like to these tags:
Perfect! Now repeat this step for all your 3rd party tags, make sure you are adding the consent checks related to each service.
5) Add the respective custom events (step 4) to your tags.
This step will make sure that the tags are firing instantly when the user consent preferences are updated:
Add the "Event is updateConsent + ad granted" trigger to the Marketing tags (eg. Facebook, Optimonk)
Add the "Event is updateConsent + analytics granted" trigger to the Analytics and Tracking tags (eg. Hotjar, etc).
Important: You don't need to add the extra event trigger to Google's default tags (Eg. Google Analytics, Google Ads).
See the example below:
Now it's time to debug your Google Consent Mode implementation. Check the video below:
3) Based on Cookies Values
Level: Flexible Setup
Recommended: Useful for NROs that don't have strict local privacy & cookies legislations
Instead of avoiding Google Tag Manager to load before user consent, we have taken a new approach. By disabling the “Enforce Cookies Solution” (on Planet 4 Settings > Analytics) we are able to control what types of tags are going to be fired based on user preferences.
1) Disable the Enforce Cookies Policy at WordPress (Planet 4 Settings > Cookies)
2) Create new custom variables in Google Tag Manager
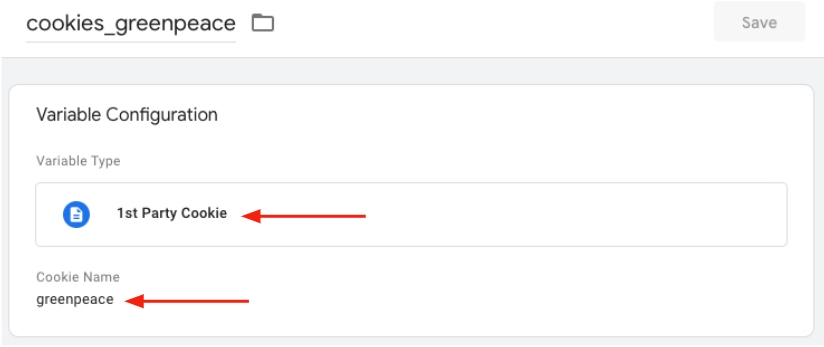
Go to your container and create new custom variables with the type "1st Party Cookie". This variable will capture the cookie's value once it's placed on the user browser.
Use the table and image below for reference:
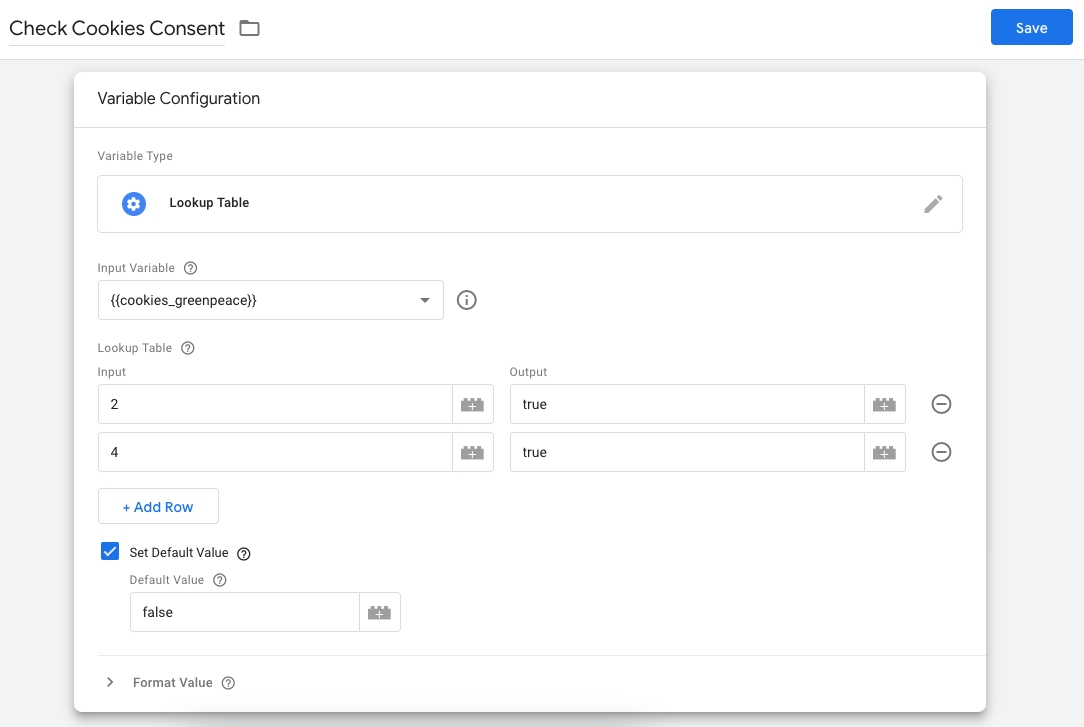
3) Create a Lookup Table variable to capture user consent.
This variable will help you to block or allow Google Advertising features. By default, the advertising features should be blocked unless the user gives explicit consent (e.g. by accepting the cookies block).
Create a Lookup Table variable {{Check Cookies Consent}} and select the input variable as {cookies_greenpeace}. Don’t forget set the default value as ‘false’.
Take a look at the example below:
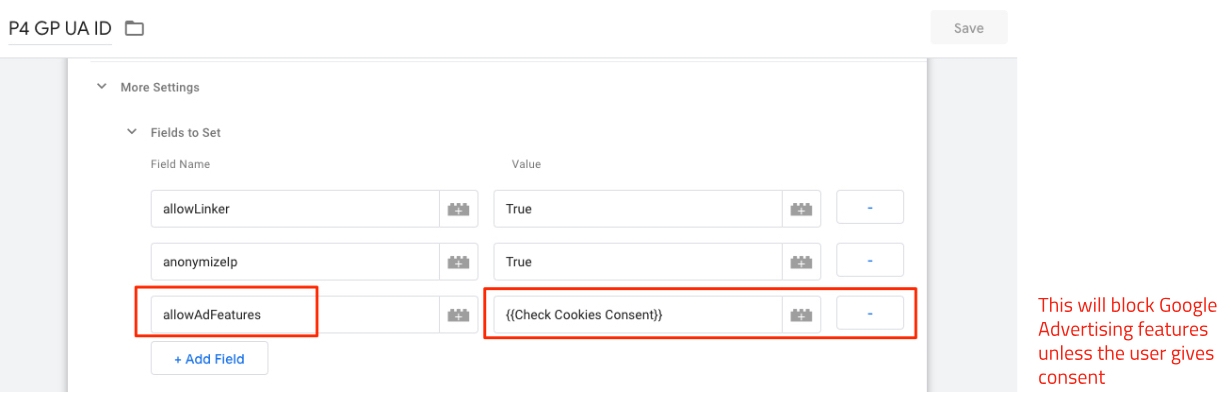
4) Edit your Google Analytics settings variables.
Select the GA settings variables {{P4 GP UA ID}} and {{P4 EN UA ID}} and add a new field called allowAdFeatures with value based on the {{Check Cookies Consent}}.
You should block the advertising features for the Global Property on both variables (Planet 4 and Engaging Networks).
5) Create your blocking triggers
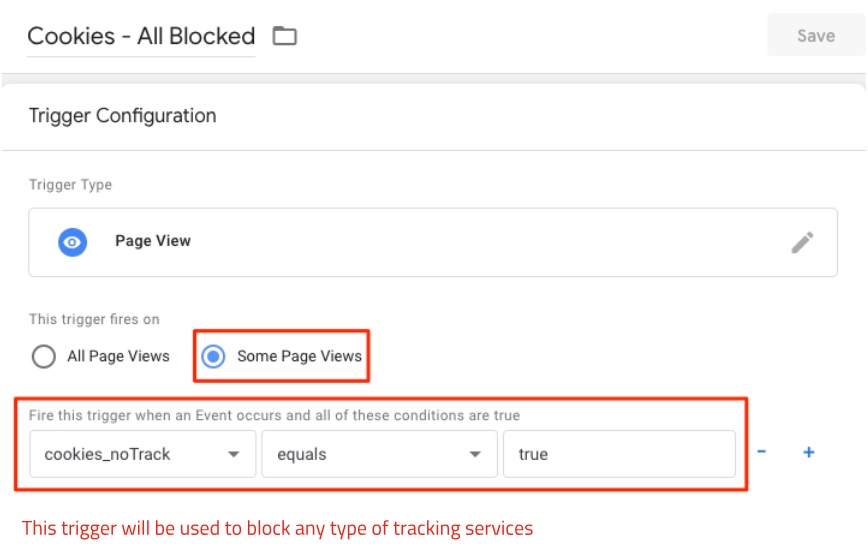
5.1. Create a trigger to block all tags called "Cookies – All blocked"
Trigger Type: Page View
Fire on some page views when: {{cookies_noTrack}} equals true
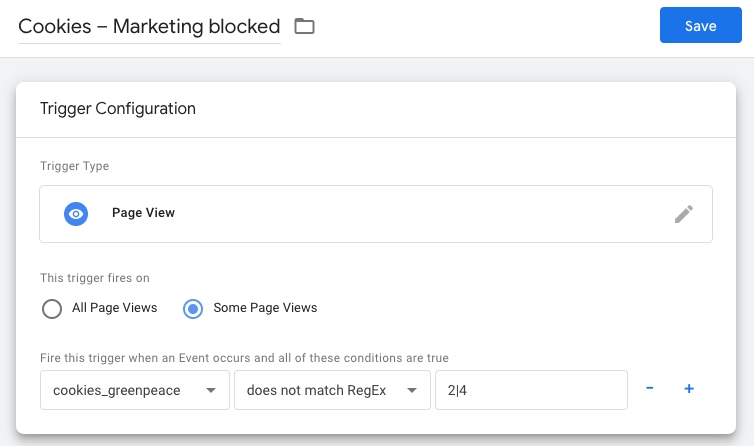
5.2. Create a trigger to block Marketing tags called "Cookies – Marketing blocked"
Trigger Type: Page View
Fire on some page views when: {{cookies_greenpeace}} does not matches RegEx 2|4
5.2. Create a trigger to block Marketing tags called "Cookies – Marketing blocked"
Trigger Type: Page View
Fire on some page views when: {{cookies_greenpeace}} does not matches RegEx 2|4
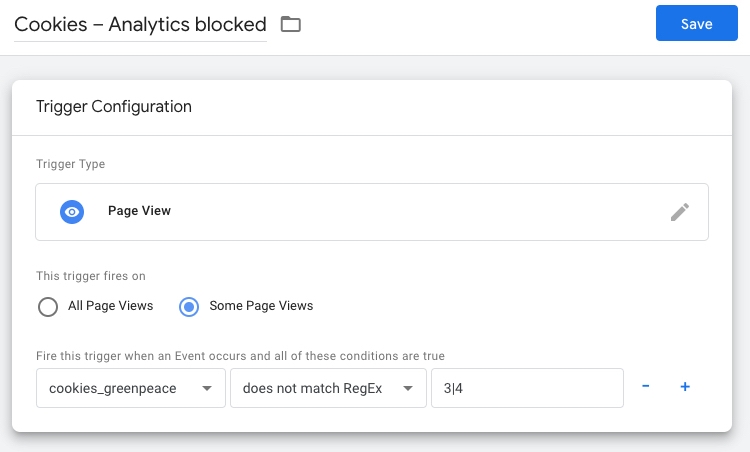
5.3. Create a trigger to block Analytics tags called "Cookies – Analytics blocked"
Trigger Type: Page View
Fire on some page views when: {{cookies_greenpeace}} does not matches RegEx 3|4
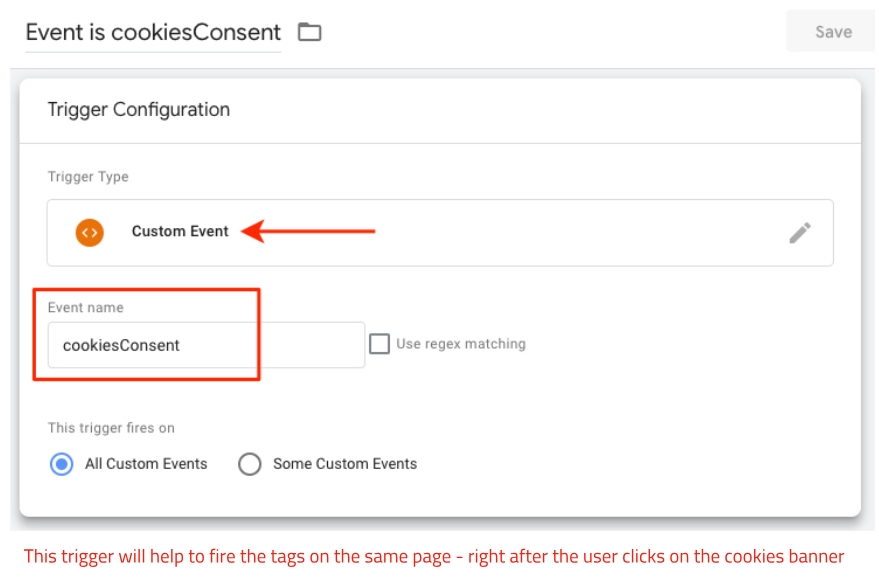
6) Create an event trigger called "Event is cookiesConsent"
Trigger Type: Custom Event
Event name: cookiesConsent
7) Apply the triggers to existing tags
This is the moment where you should make your due diligence and decide which tags you'll allow to run and at which point. We recommend not firing any tags from 3rd party vendors that could capture personally identifiable information before user consent is given. If you are under GDPR or similar legislations that require user consent for analytics cookies, you should also avoid firing any tracking services on the page before total awareness of your users (even if data is anonymised).
7.1) Edit all your tags and add the blocking triggers that match your user's consent preferences.
Important: the exception triggers must match the firing triggers type, otherwise they won't work properly. If necessary, duplicate the triggers created in the previous step and change their trigger type.
8) Debug!
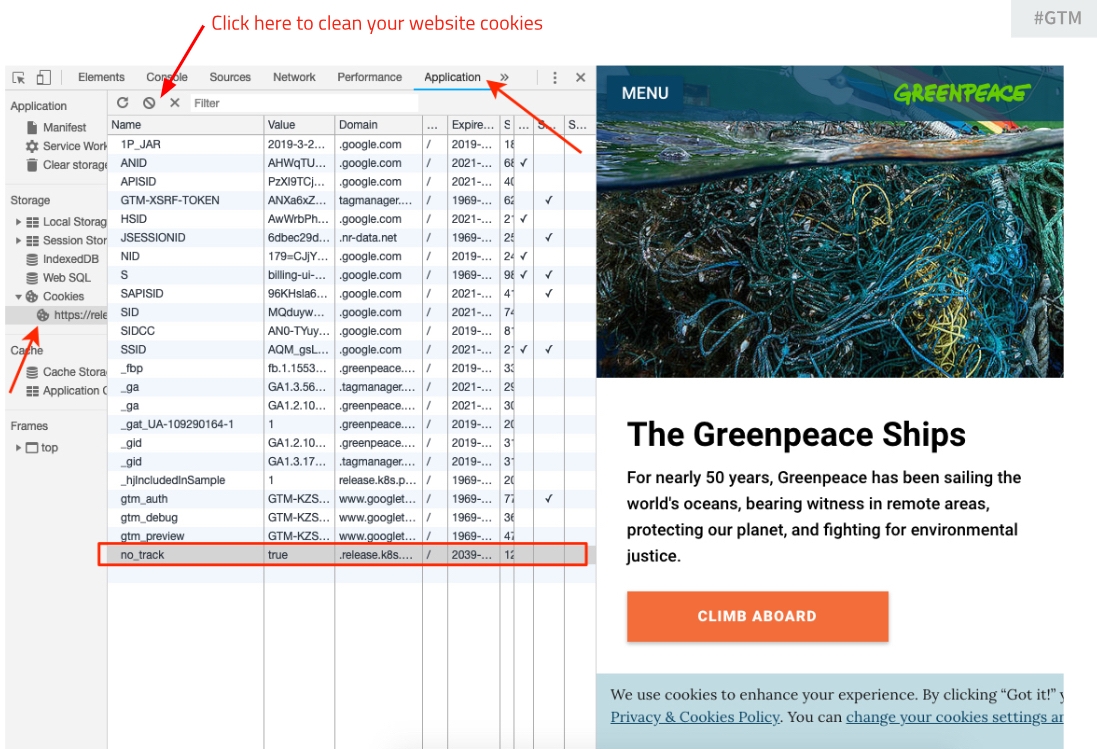
8.1. Clean your cookies before starting the debug
Open the Developer Tools (right-click on the website and select Inspect) and select the Application Tab. Under Storage expand Cookies, then select a website (check detailed instructions here). Select the “blocked symbol” to clean your cookies:
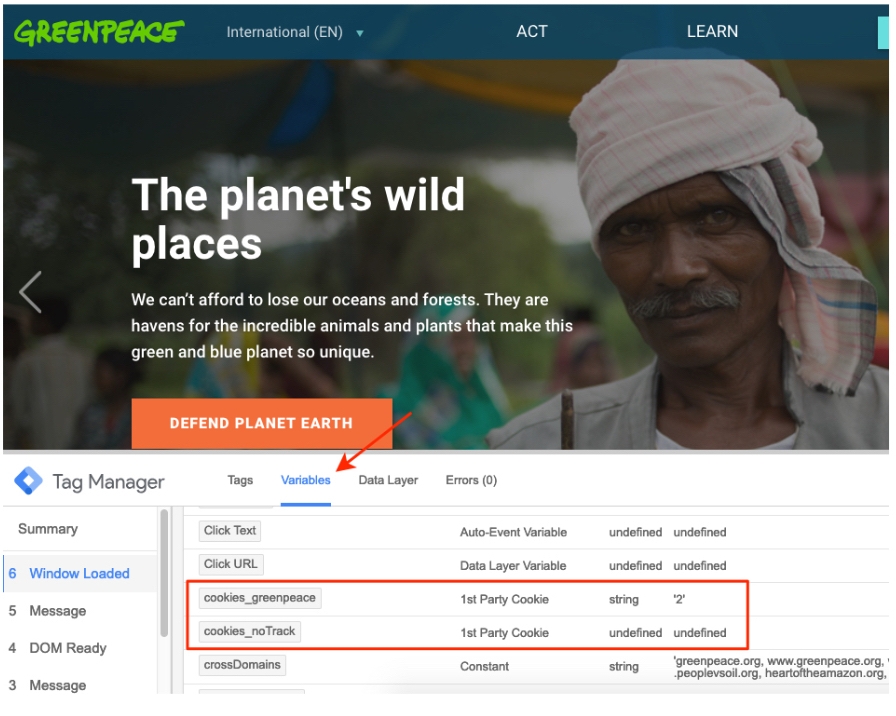
8.2. Check if your variables and tags are being triggered
The 1st party cookie variables should change the value according to the user stories described above – make sure you are testing all of them. You can use the DevTools window (above) or the GTM Debug (below) to test your setup:
8.3. Watch this live debug video.
We recorded a video testing all user cases on the Planet 4 website. Watch here to understand how you can also debug your setup (also below).
9) Test the adFeatures blocker
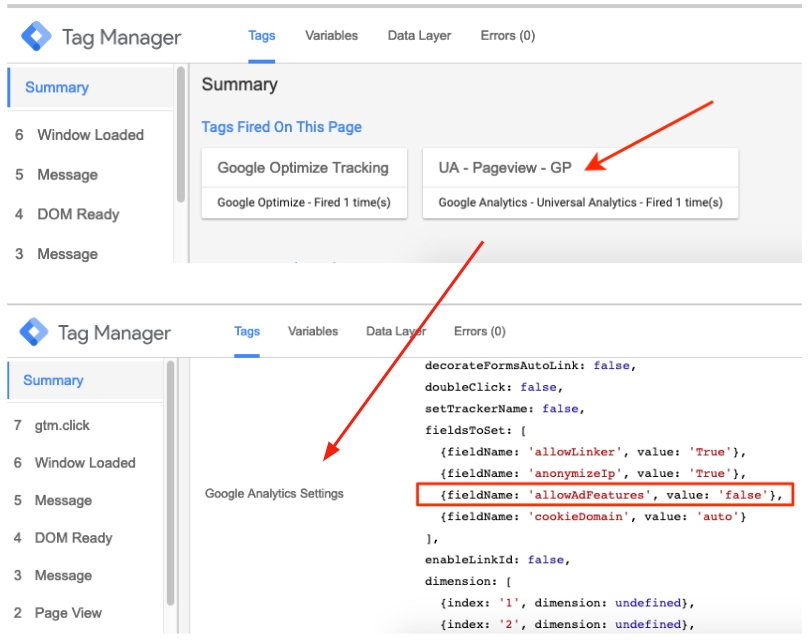
9.1. On GTM debug window you should verify your Google Analytics Settings
Clicking on the Google Analytics tag. Eg: “UA – Pageviews – GP” to check the details. The field ‘allowAdFeatures’ should be false by default unless the user gives full consent (when ‘greenpeace’ cookie = ‘2’)
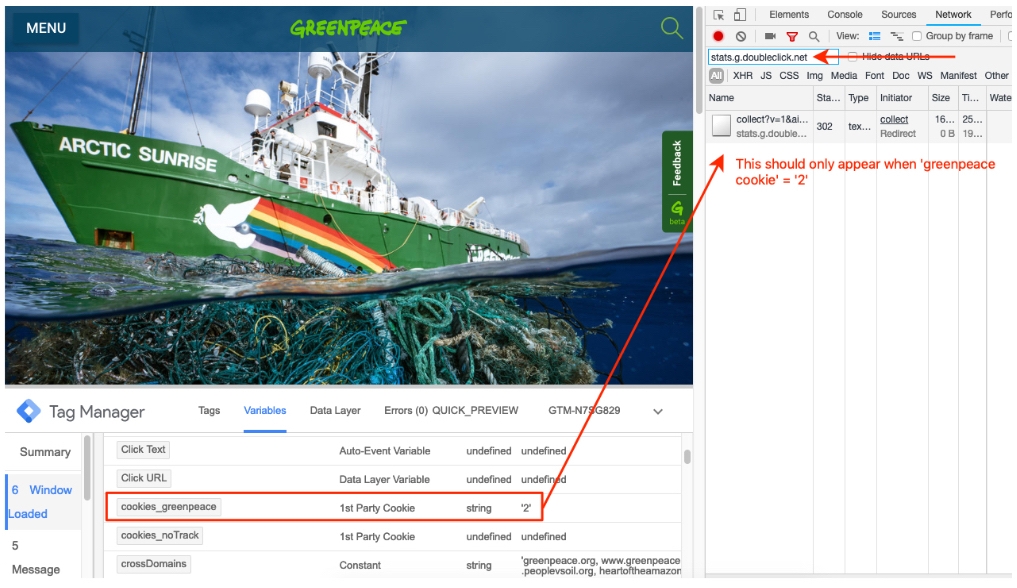
9.2. Open the tab Network (Developer Tools) and filter results for stats.g.doubleclick.net
You should only see a connection with stats.g.doubleclick.net if the user has given consent (‘greenpeace’ cookie = ‘2’). Otherwise, there should be none results on this panel.
10) Publish your container
Are you comfortable with the new setup? Have you tested it and signed off? If so, please, remember to disable the Enforce Cookies Policy on the live website and track the performance for the next weeks to see if it was responsible for any changes in your traffic performance.
Last updated